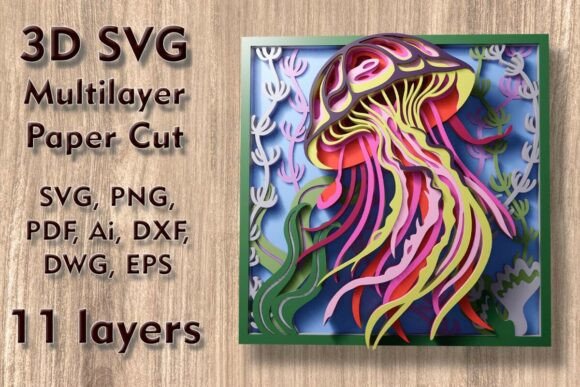
Mastering the Art of Depth: A Comprehensive Guide to the Jellyfish 3D SVG Multilayer Paper Cut
In the evolving landscape of digital fabrication and home decor, the demand for pieces that offer visual depth and tactile complexity has never been higher. Among the most captivating designs emerging from this intersection of art and technology is the Jellyfish 3D SVG Multilayer Paper Cut. This specific design is not merely a flat image converted into vector data; it is a sophisticated architectural blueprint for three-dimensional space, meticulously engineered to transform two-dimensional materials into enchanting wall art.
For creators ranging from professional interior designers to hobbyist crafters using Cricut or Silhouette machines, understanding the nuances of multilayered SVG files is crucial for achieving high-quality results. This article explores the technical specifications, material considerations, creative applications, and practical workflows associated with creating stunning 3D jellyfish displays using the 9.85 x 9.85-inch (250 x 250 mm) format.
The Anatomy of a 3D Vector Design
To appreciate the final product, one must first understand the digital foundation. The Jellyfish Mundala Svg is categorized as a 3D multilayered SVG design, which means it consists of multiple distinct layers stacked upon one another to create perspective and shadow. In this specific file set, there are exactly 11 separate layers. Each layer represents a different plane of the jellyfish’s anatomy—from the central bell and tentacles to the background elements that provide context and depth.
Unlike traditional single-layer cut files where all shapes exist on the same Z-axis, these layered files require the user to physically separate the components during assembly. The design is optimized for a finished size of 9.85 inches wide by 9.85 inches high, corresponding to a 250 x 250 mm cutting area. This square format is particularly versatile for standard shadow box frames and gallery walls.
Scalability and Proportional Integrity
One of the critical advantages of vector-based formats like SVG, DXF, and AI is their scalability. The Jellyfish 3D SVG Multilayer Paper Cut can be easily increased in size to create large-scale statement pieces. However, caution is required when scaling down. Reducing the dimensions too drastically can compromise the integrity of thin elements, such as delicate tentacle strands or intricate internal details. When resizing, always ensure that the thinnest lines remain thick enough for your chosen material and cutting machine to handle without tearing or breaking.
Material Selection for Optimal Results
The aesthetic outcome of your project is heavily influenced by the material chosen for each layer. The versatility of the Jellyfish 3D SVG Multilayer Paper Cut Files for 3D Wall Art and Shadow Box allows for a wide range of substrates. Below are the most common materials used and their specific characteristics.
- Plywood and Wood: For a natural, rustic, or modern minimalist look, plywood is an excellent choice. It provides structural rigidity and a warm tone. Laser cutting wood creates a slight char along the edges, which can add character if desired, though sanding may be needed for a polished finish.
- MDF (Medium Density Fiberboard): This material offers a smooth, uniform surface ideal for painting after cutting. It is generally more affordable than solid wood and cuts cleanly with both laser and CNC routers.
- Paper and Cardstock: For lightweight projects or temporary displays, heavy-weight cardstock or specialized paper works well. This is the preferred medium for Cricut and Silhouette users. Layering different shades of white or pastel colors can mimic the translucent quality of real jellyfish.
- Acrylic: If you have access to a laser cutter capable of handling plastics, acrylic sheets can produce a stunning, glossy effect. Light passing through layered acrylic creates vibrant refractions, enhancing the "underwater" illusion.
- Cardboard: An eco-friendly and cost-effective option for prototyping or educational projects. Corrugated cardboard adds texture but requires careful handling to prevent fraying.
- Aluminum: For industrial or contemporary decor, thin aluminum sheets can be laser-cut to create sleek, metallic accents. This adds a premium feel to the artwork.
Technical File Formats and Compatibility
Upon purchase, the Jellyfish 3D SVG Multilayer Paper Cut is delivered in a comprehensive ZIP folder containing multiple file formats to ensure compatibility across various software and hardware ecosystems. Understanding these formats helps streamline the workflow.
- SVG (Scalable Vector Graphics): The primary format for most cutting machines, including Cricut Design Space and Silhouette Studio. It preserves the layer structure, allowing you to assign different materials or colors to each layer before cutting.
- Layered SVG Files: These are specifically organized within the software interface, making it easy to isolate individual layers for editing or color assignment.
- DXF (Drawing Exchange Format): Widely supported by CAD software and many laser cutting programs. Ideal for users who prefer AutoCAD or similar engineering tools.
- DWG: Similar to DXF but native to AutoCAD, offering precise control over lineweights and layers for professional drafting environments.
- EPS (Encapsulated PostScript): A robust vector format often used in graphic design software like Adobe Illustrator. It ensures high-quality output for professional printing or cutting.
- AI (Adobe Illustrator): The native format for Illustrator, providing full editability of paths, nodes, and effects for advanced users.
- PNG (Portable Network Graphics): Raster images included for reference purposes or for users who need a quick preview without vector software.
- PDF (Portable Document Format): Useful for viewing the design at scale or for printing instructions. It also serves as a backup vector source in some viewers.
Workflow: From Digital File to Physical Art
Creating the Jellyfish 3D SVG Multilayer Paper Cut involves a systematic process that bridges digital precision with manual craftsmanship. Here is a recommended workflow for achieving professional-grade results.
Step 1: Preparation and Software Setup
Import the SVG file into your preferred software. Whether you are using Cricut Design Space, Silhouette Studio, or Adobe Illustrator, organize the layers logically. Assign specific colors or material types to each layer to keep track of them during the cutting process. Ensure that the document size matches your desired output dimensions, keeping in mind the 250 x 250 mm base size.
Step 2: Material Loading and Machine Calibration
Load your chosen material—be it plywood, acrylic, or cardstock—into your cutting machine. Calibrate the blade depth or laser power settings according to the material thickness. For thin elements, such as the fine tentacles of the jellyfish, use a sharp blade or appropriate laser speed to prevent burning or tearing. Test cuts are highly recommended, especially when working with new materials.
Step 3: Cutting and Weeding
Execute the cut for each layer separately. After cutting, carefully remove the excess material (weeding). Pay special attention to the negative space areas, ensuring that no unintended connections remain between the jellyfish’s body parts. For complex layers, tweezers may be necessary to extract small fragments.
Step 4: Assembly and Layering
This is where the magic happens. The 11 layers must be assembled in a specific order to create the 3D effect. Typically, the largest background layer goes at the back, followed by progressively smaller and more detailed layers towards the front. Use spacers such as foam tape, wooden dowels, or acrylic rods to maintain consistent distance between layers. This spacing is critical for casting shadows and enhancing the perception of depth.
Align the layers precisely using registration marks provided in the SVG file or by manually centering them. Secure the assembly using adhesive dots, glue, or mechanical fasteners depending on the weight of the materials. For wooden or acrylic versions, a strong craft glue or epoxy works best. For paper versions, double-sided tape or foam pads are sufficient.
Creative Applications and Decorative Uses
The versatility of the Jellyfish 3D SVG Multilayer Paper Cut extends beyond simple wall hanging. Its thematic appeal makes it suitable for various decorative contexts.
- Home Wall Decor: The oceanic theme brings a calming, serene vibe to living rooms, bedrooms, or bathrooms. The interplay of light and shadow changes throughout the day, offering a dynamic visual experience.
- Nursery and Child’s Room: The whimsical nature of the jellyfish makes it an ideal decoration for children’s spaces. Using soft pastel colors in paper or light wood can create a gentle, dreamy atmosphere.
- Commercial Spaces: Restaurants, spas, and boutiques with marine themes can use larger versions of this design as focal points. Acrylic or metal versions add a touch of sophistication and durability.
- Educational Displays: Teachers can use this design to teach students about marine biology, geometry, and digital fabrication. The layered structure provides a tangible way to discuss the anatomy of a jellyfish.
- Gifts and Cards: Smaller scaled-down versions can be incorporated into greeting cards or gift tags, adding a unique, handcrafted touch to presents.
Considerations for Different Cutting Technologies
While the design is universal, the execution varies slightly depending on the tool used.
Cricut and Silhouette Users: Focus on material thickness limitations. Standard blades can handle up to 2mm of chipboard, but for thicker woods, a deep-cut blade or scoring wheel might be needed. Ensure your mat holds the material securely to prevent shifting during the cut.
Laser Cutter (Glowforge, etc.) Users: Benefit from the ability to cut intricate details with high precision. Engraving can be added to certain layers for additional texture. Be mindful of ventilation and fume extraction when cutting acrylics or treated woods.
CNC Router Users: Suitable for thicker materials like solid wood or MDF. The toolpath optimization in the DXF/DWG files ensures efficient material usage. Post-processing may involve sanding to remove router marks.
Conclusion
The Jellyfish 3D SVG Multilayer Paper Cut represents a fusion of artistic vision and technical precision. By leveraging the provided 11-layer design and utilizing the appropriate materials and tools, creators can produce stunning 3D wall art that captivates viewers. Whether you are upgrading your crafting repertoire with a Cricut, exploring the capabilities of a Glowforge, or simply looking for a unique home decor project, this design offers endless possibilities. Remember to respect the proportions of thin elements, choose materials that complement the aesthetic, and take care in the assembly process to unlock the full potential of this enchanting marine-inspired artwork.