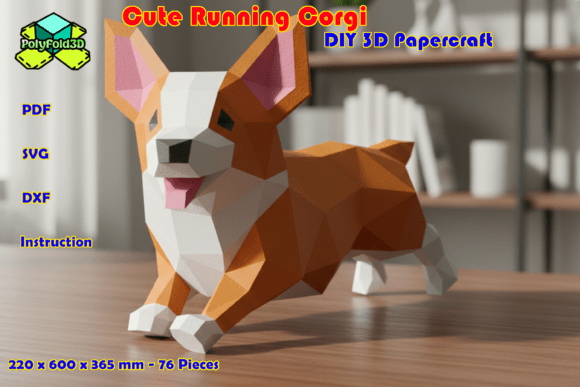
Unleash Your Creativity: A Comprehensive Guide to Assembling the 3D Papercraft Corgi
In an era dominated by digital screens and mass-produced plastics, there is a profound resurgence in tactile, hands-on hobbies. Among these, paper modeling has carved out a unique niche for enthusiasts who appreciate precision, patience, and the sheer satisfaction of creation. One of the most charming projects currently captivating hobbyists is the 3D Papercraft Corgi. This isn't just a simple cutout; it is a meticulously engineered three-dimensional model that captures the playful spirit and distinctive silhouette of one of the world’s most beloved dog breeds.
Whether you are a seasoned papercrafter looking for your next challenge or a beginner seeking a rewarding weekend project, understanding the nuances of this DIY experience is key to success. This guide explores the design, materials, assembly process, and the broader joy of bringing a Paperpoly product to life.
Why Choose a 3D Papercraft Corgi?
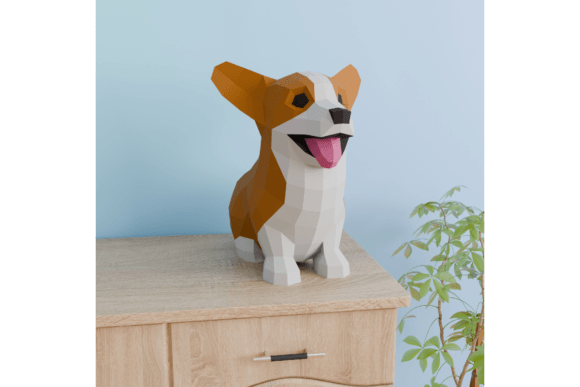
The Corgi, with its short legs, long body, and expressive ears, presents a unique geometric challenge that makes it an ideal subject for 3D modeling. Unlike more organic shapes, the Corgi’s form relies on clean lines and distinct angles, which translates beautifully into paper engineering. The Designer Paperpoly Product Name 3D Papercraft Corgi is not merely a toy; it is a piece of decorative art that brings warmth and personality to any space.
For dog lovers, owning a physical representation of their favorite breed offers a tangible connection to their passion. For papercraft enthusiasts, the project serves as a test of skill. It requires attention to detail, steady hands, and a methodical approach. The result is a stunning centerpiece that stands between 40cm (15.7in) in height and 41.5cm (16.3in) in length, making it large enough to be noticed but small enough to fit on a shelf or desk.
Understanding the Materials and Specifications
Before diving into the assembly, it is crucial to understand the components involved. The quality of the final model is directly tied to the materials used. This specific kit is designed to work optimally with high-quality cardstock, ensuring that the finished Corgi holds its shape and looks professional.
Required Sheet Count and Color Palette
To construct this intricate model, you will need a total of 20 sheets of A4 or US Letter sized paper. The color distribution is carefully calculated to mimic the natural coloring of a Corgi while maintaining structural integrity:
- White (7 sheets): Used for the underbelly, paws, and facial highlights, providing contrast against the darker fur.
- Light Brown (11 sheets): The primary color, forming the majority of the body, back, and head.
- Pink (1 sheet): Essential for adding life to the nose and inner ears, giving the model character.
- Black (1 sheet): Used for the eyes and nose details, creating the focal point of the face.
Recommended Cardstock Weight
While standard printer paper can technically be used, it often lacks the stiffness required to hold complex folds without collapsing. For the best results, experts recommend using Encore Cardstock 80 lb cover (216 gsm). This weight provides the perfect balance: it is thick enough to stand up on its own and maintain its 3D structure, yet thin enough to fold cleanly without tearing. If you are looking to source these materials, visiting specialized shops like the 12×12 Cardstock Shop can provide access to premium options that enhance the visual appeal of your project.
Step-by-Step Assembly Process
Assembling the 3D Papercraft Corgi is a journey that unfolds in several distinct phases. Patience is your greatest ally here. Rushing through any step can lead to misalignment or glue stains that detract from the final look.
Phase 1: Preparation and Printing
First, download and unzip the files provided with your purchase. You will receive two main types of files: SVG cutting files for those with electronic cutting machines (like Cricut or Silhouette) and PDF instructions for manual assembly. Ensure your printer settings are adjusted to "Actual Size" or "100% Scale." Do not select "Fit to Page," as this will distort the proportions, making parts impossible to align correctly.
Phase 2: Cutting and Scoring
Once printed, the next step is cutting. If you are using a cutting machine, follow the SVG layer guides precisely. For manual cutters, use sharp craft scissors or a rotary cutter. Precision at this stage is vital; jagged edges will show when you glue the pieces together.
After cutting, pay close attention to the folding lines. Many templates include dashed lines indicating where to score the paper. Use a bone folder or the blunt end of a knife to crease these lines firmly before folding. This pre-folding ensures crisp, clean edges rather than rounded, messy bends.
Phase 3: Gluing and Construction
This is where the magic happens. Refer to the included Visual Guide, which breaks down the assembly into logical steps. Typically, you will start with smaller internal structures, such as the legs and tail, before attaching them to the main body. Use a PVA glue or a fine-tip applicator to minimize excess adhesive. Apply glue sparingly to tabs, press firmly, and allow each section to set before moving to the next. Working in sections prevents the model from becoming floppy and difficult to handle.
Common Misconceptions About Papercraft
Many beginners assume that 3D papercraft is inherently difficult or time-consuming. While it does require time, the difficulty level is moderate. The instructions are designed to be intuitive, guiding you through the logic of how flat surfaces transform into volume. Another common misconception is that mistakes are fatal. In reality, papercraft is forgiving. If a tab doesn’t align perfectly, you can often adjust it before the glue dries completely. If a part is damaged, spare pages in the PDF template usually allow for re-printing individual components.
The Broader Impact of DIY Crafting
Engaging with projects like the 3D Papercraft Corgi goes beyond mere decoration. In our fast-paced modern life, the act of crafting offers a meditative break from digital overload. It encourages mindfulness, as you must focus entirely on the task at hand. Furthermore, it fosters a sense of accomplishment. Creating something with your own hands—from raw paper to a recognizable figure—boosts confidence and creativity.
For educators and parents, these models serve as excellent tools for teaching geometry, spatial reasoning, and fine motor skills. They bridge the gap between traditional arts and modern technology, as many kits now incorporate digital design principles accessible through home printers.
Final Thoughts
The 3D Papercraft Corgi is more than just a collection of paper pieces; it is an invitation to slow down and enjoy the process of creation. With approximately 20 sheets of colorful cardstock and clear instructions, you have everything you need to build a companion that stands nearly 16 inches tall. Whether displayed in your home office, gifted to a friend, or enjoyed as a personal milestone, this project encapsulates the joy of DIY culture.
So, gather your tools, print your templates, and prepare to meet your new furry friend. The joy of crafting is waiting, and the result is sure to be adorable.