Tool Box 3D Papercraft: A Versatile Solution for Creative Storage and Decor
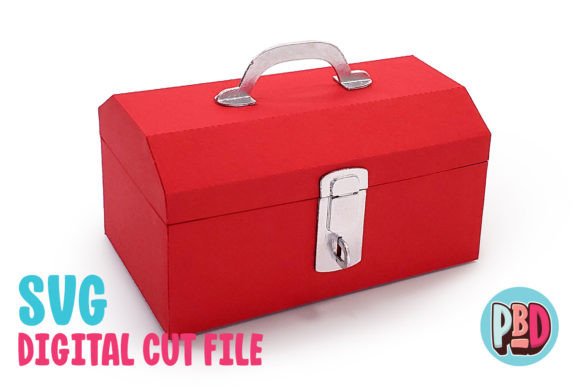
When it comes to DIY projects that blend functionality with aesthetic appeal, few options are as charming and practical as the Tool Box 3D Papercraft. This design is more than just a simple paper model; it is a fully realized, three-dimensional object that serves multiple purposes in the modern home. Whether you are looking for a unique way to package treats for a party, seeking an affordable decor item for a child’s bedroom, or simply wanting to add a touch of vintage-inspired organization to your craft room, this papercraft project offers a compelling solution.
The beauty of this project lies in its accessibility and adaptability. It is designed to be built using medium cardstock, making it sturdy enough to hold small items while remaining lightweight and easy to assemble. With dimensions of 5 inches in length, 3 inches in depth, and 4 inches in height, the scale is perfect for desktop use or display on shelves. But beyond its physical attributes, the true value of the Tool Box 3D Papercraft is found in the creative freedom it provides, from custom texturing to personalized painting techniques.
Why Choose a Papercraft Tool Box?
In a market saturated with mass-produced plastic and metal storage containers, there is a growing desire for handmade, personalized items that reflect individual style. The Tool Box 3D Papercraft addresses several common challenges faced by crafters and decorators:
- Cost-Effectiveness: Compared to purchasing decorative wooden or metal toolboxes, creating your own from digital files significantly reduces costs. You only need cardstock, adhesive, and paint.
- Customization: Off-the-shelf items often come in limited colors and finishes. With this papercraft design, you control every aspect of the look, from the grain of the "wood" to the color of the "metal."
- Eco-Friendly Options: By using recyclable cardstock and avoiding plastic packaging, you can create a sustainable gift or decor item.
- Gifting Potential: The hinged lid design makes it an excellent container for small gifts, candies, or jewelry, turning a functional object into a memorable present.
This project is particularly appealing to adults who enjoy hands-on creativity but may not have access to heavy machinery or woodworking tools. It bridges the gap between simple origami and complex model building, offering a satisfying sense of accomplishment without requiring advanced technical skills.
Design Features and Functional Benefits
One of the standout features of the Tool Box 3D Papercraft is its hinged lid. Unlike many papercraft boxes that require glue to close or lack a secure closure mechanism, this design allows you to open and close the box repeatedly. This functionality transforms it from a static decoration into a usable container. You can store sewing supplies, makeup brushes, small electronics accessories, or party favors, knowing they will stay organized and protected.
The proportions—5 L x 3 D x 4 H—are carefully calculated to maximize interior space while maintaining structural integrity. The depth of 3 inches is sufficient to hold taller items like scissors or bottles, while the width allows for flat objects like cards or photos. This versatility means the toolbox can serve different roles depending on the user’s needs. For a child’s bedroom, it might become a treasure chest for toys. In a workshop, it could organize screws and nails. At a party, it might serve as a themed favor box.
Material Selection and Construction Tips
To achieve the best results with the Tool Box 3D Papercraft, selecting the right materials is crucial. The instructions specify the use of medium cardstock. This weight provides the necessary rigidity to hold the box’s shape without being too difficult to fold or cut. Heavier stocks may resist folding cleanly, while lighter papers might lack the durability needed for a functional container.
Once the pieces are cut and folded, the real artistry begins. The included instructions provide detailed texturing and painting tips to help you achieve realistic finishes. Here are some recommendations for enhancing your build:
- Base Coating: Start with a solid base coat of acrylic paint. If you are aiming for a classic red toolbox look, choose a vibrant crimson. For a rustic vibe, opt for weathered grays or browns.
- Texturing Techniques: To mimic wood grain or brushed metal, use dry brushing techniques. Apply a small amount of darker or lighter paint to a dry brush and lightly drag it over the surface. This adds depth and realism that flat coloring cannot achieve.
- Aging Effects: For a vintage appearance, consider sanding the edges slightly after painting to reveal the white cardstock underneath, simulating wear and tear. Alternatively, use a wash of diluted brown paint to settle into the crevices, highlighting the folds and seams.
- Hardware Details: Use metallic markers or stickers to add latches, hinges, and handles. These small details elevate the design from a simple box to a convincing miniature tool case.
Remember that patience is key. Allow each layer of paint to dry completely before handling the piece to prevent smudging. This attention to detail ensures that your final product looks professional and polished.
Digital File Formats and Software Compatibility
Accessing the Tool Box 3D Papercraft involves downloading a ZIP file containing essential components: an SVG cut file, a DXF cut file, and PDF instructions. Understanding how to handle these files correctly is vital for a smooth crafting experience.
SVG Files: The SVG format is generally recommended for users with modern cutting machines. It can be used with Silhouette Designer Edition and above, as well as Cricut Design Space. SVG files offer precise vector data, resulting in cleaner cuts and easier manipulation within the software. If you have access to these platforms, this is your preferred option.
DXF Files: For those using Silhouette Basic Edition or other compatible software, DXF files are provided. However, there are important considerations when working with DXF files:
- Loading Speed: DXF files tend to open more slowly in Silhouette Studio compared to SVGs.
- File Cleanliness: They may not appear as clean as SVG files upon import, potentially requiring additional cleanup steps.
- Preference Settings: To ensure the file loads properly, you must adjust your import preferences. Go to Edit Preferences > Import DXF and change the setting from “As-is” to “Centered.” Failure to do so may result in alignment issues or failed cuts.
It is important to note that all downloaded files must be extracted from the ZIP archive before attempting to open them. Using unextracted files can lead to errors in your cutting software.
Practical Applications and Outcomes
The Tool Box 3D Papercraft is not just a craft project; it is a resource for various life situations. For parents, it offers a fun weekend activity that results in a useful toy organizer. For event planners, it provides a customizable prop for themed parties, such as construction sites, mechanic shops, or retro diners. For artists, it serves as a portable palette or storage for paints and brushes.
By focusing on the outcome rather than just the features, users can tailor the project to their specific needs. Some may prioritize speed, opting for a quick single-color paint job, while others may spend hours detailing intricate textures. Both approaches are valid and result in a finished product that brings joy and utility to the user’s space.
Conclusion
The Tool Box 3D Papercraft stands out as a versatile, affordable, and highly customizable solution for storage and decor. Its combination of practical design, clear instructions, and flexible material options makes it accessible to a wide range of users. Whether you are a seasoned crafter looking for a new challenge or a beginner eager to try your hand at 3D papercraft, this project delivers both satisfaction and utility. By following the provided guidelines for material selection, painting, and software usage, you can create a beautiful, functional tool box that enhances your home or workspace. Embrace the creative process, experiment with different styles, and enjoy the tangible results of your efforts.