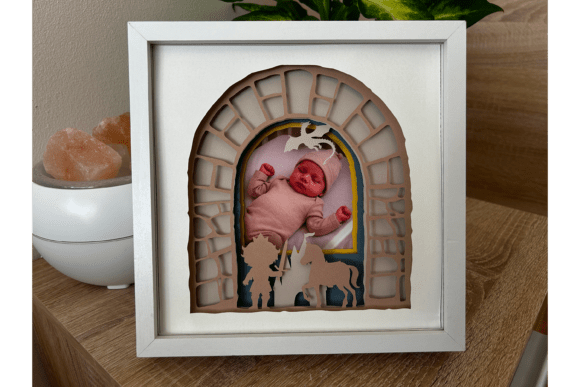
3D Baby Shadow Box Photo Frame - SVG
Capturing the fleeting moments of early parenthood is a universal desire, yet displaying those memories in a way that feels truly special can be challenging. Standard flat frames often fail to convey the depth and texture of the emotions involved in welcoming a new life. This is where the 3D Baby Shadow Box Photo Frame - SVG comes into play, offering a creative solution for parents, grandparents, and crafters who want to create personalized, multi-dimensional keepsakes. By combining digital precision with tactile crafting, you can transform simple paper and cardstock into a stunning 3D display that stands out on any shelf or mantelpiece.
The concept behind a shadow box frame is to use layers to create depth. Unlike traditional framing, which presents a single plane, a shadow box allows elements to sit at varying distances from the background. This technique adds a sense of volume and realism, making the subject pop. The 3D Baby Shadow Box Photo Frame - SVG template simplifies this complex process by providing pre-designed vector files that ensure perfect alignment and scaling. Whether you are a seasoned scrapbooker or a beginner looking for a meaningful project, these templates provide the structural foundation needed to achieve professional-looking results without requiring advanced design skills.
Understanding the Format Options: PDF vs. SVG
One of the primary advantages of this product is its versatility in file formats. Understanding the difference between the available options ensures you choose the right tool for your specific workflow. The package includes two distinct types of templates designed to cater to different crafting methods.
- PDF Templates (20x20 cm / 8x8 inches): These files are optimized for standard home printers and manual cutting. If you prefer the tactile experience of hand-cutting or do not own a digital cutting machine, the PDF format is ideal. You simply print the design onto colored cardstock and use scissors or a craft knife to carefully cut out the shapes. This method is accessible to everyone and requires minimal technical setup.
- SVG Files: For those with electronic cutting machines like Cricut or Silhouette, the SVG format offers superior precision and speed. These vector files fit to any size, allowing you to scale the design up or down while maintaining crisp edges. The software interprets the SVG data to guide your machine’s blade, ensuring that intricate details—such as tiny booties, rattles, or delicate lace patterns—are cut perfectly every time.
It is crucial to verify that your cutting machine and accompanying software support one of these file formats before purchasing. While PDFs are universally readable, SVGs require specific compatibility with vector editing or cutting software. Choosing the correct format streamlines the creation process and reduces the likelihood of errors during the assembly phase.
Gathering Your Materials
Creating a high-quality shadow box requires more than just the digital template; it demands the right physical materials to achieve the desired three-dimensional effect. The success of your 3D Baby Shadow Box Photo Frame - SVG project depends largely on the quality and type of supplies you select.
First, you will need a sturdy frame. A 20x20 cm (8x8 inches) frame with a depth of approximately 3 cm (1.2 inches) is recommended. This depth is essential because it provides enough space for multiple layers of cardstock and spacers. Without sufficient depth, the layers will press against the glass, flattening the 3D effect and potentially damaging the artwork.
For the layers themselves, colored cardstock weighing between 180-200 gsm is ideal. This weight is thick enough to hold its shape and provide opacity, yet thin enough to allow for clean cuts and easy layering. Avoid overly thin paper, which may warp, or excessively thick board, which might be difficult to cut or stack neatly.
To create the illusion of depth, you will need spacers. 5mm foamboard or double-sided foam tape works exceptionally well for this purpose. These materials elevate each layer slightly above the one below it, creating distinct planes that catch light and shadow differently. Glue is also necessary to adhere the layers to the spacers and secure them within the frame backing. Finally, if you are using a cutting machine, ensure you have fresh blades to prevent tearing the cardstock.
Step-by-Step Implementation
Once you have your materials ready, the assembly process becomes a meditative and rewarding experience. The goal is to build the image from back to front, adding layers progressively.
Begin by printing or cutting your SVG layers according to the instructions provided in the template file. Typically, designs include a background layer, mid-ground elements, foreground accents, and a central area reserved for the photograph. Cut out each piece with care, removing any excess material from the interior cutouts.
Next, prepare your spacers. Apply strips of 5mm foam tape to the back of each cardstock layer, excluding the very edge where the frame will grip. Alternatively, glue small squares of foamboard to the corners and center of each layer. The key is consistency; try to keep the spacing uniform across all layers to maintain a balanced aesthetic.
Stack the layers starting with the background. Adhere the next layer on top, ensuring proper alignment. Continue this process until all decorative elements are stacked. Place your photograph in the designated spot, usually on the second-to-last layer or directly on the background, depending on the specific design of the 3D Baby Shadow Box Photo Frame - SVG.
Finally, insert the assembled stack into your deep frame. Secure it with the frame’s backing clips or screws. The result is a rich, textured piece of art that draws the viewer’s eye into the scene. The interplay of light and shadow across the raised layers gives the image a dynamic quality that flat prints cannot replicate.
Practical Applications and Customization
The beauty of using SVG templates lies in their adaptability. While the default designs are tailored for baby themes, the underlying structure can be modified for various occasions. Parents might customize the color palette to match nursery decor, choosing soft pastels for a newborn or vibrant hues for a toddler’s milestone. Grandparents might opt for classic navy and white schemes for a gender-neutral look.
Beyond babies, these techniques can be applied to other sentimental projects. The same principles of layering and depth apply to wedding invitations, anniversary gifts, or memorial displays. However, the 3D Baby Shadow Box Photo Frame - SVG remains specifically optimized for the delicate proportions and charming motifs associated with infancy, making it an excellent choice for christenings, first birthdays, or hospital discharge announcements.
It is important to note that the photo and wooden frame shown in illustrations are for demonstration purposes only and are not included with the template purchase. This allows users the freedom to source frames that match their personal style or existing home furnishings. Whether you choose a rustic wood finish, a sleek modern black, or a vintage gold leaf, the focus remains on the layered content created by the template.
Conclusion
Creating a 3D shadow box is more than just a craft project; it is an act of preservation. It transforms a digital memory into a tangible object that can be touched and admired. By leveraging the precision of SVG technology and the charm of handcrafted elements, the 3D Baby Shadow Box Photo Frame - SVG empowers users to create unique, heartfelt displays. With clear instructions, flexible file formats, and straightforward assembly steps, this template makes it easy for anyone to produce a masterpiece that celebrates the joy of new beginnings. Take the time to curate your colors, select your favorite photos, and enjoy the process of bringing your family’s story to life in three dimensions.